Web Scraping Instagram Photos with Selenium
Updated: Mar 19, 2021

Selenium is a very powerful web scraping tool, it can target specific content elements on a dynamically loading webpage and extract them mercilessly! But great power also leaves room for great errors, and in this short tutorial, I will show handy ways to bypass them and automate the entire process of Instagram image extraction.
We’ll focus on one task — web scraping a full database of cat images out of Instagram, straight onto your computer. We’ll do it step by step and we’ll discuss the challenges and the reasoning behind certain commands:
Install Selenium
If you're using Anaconda, please type the following command (after activating your working environment of course):
conda install -c conda-forge selenium
If you're using any other distribution software, please type the following command inside your command prompt terminal:
pip install seleniumInstall Web Driver
Web Driver is a tool that connects between your code and your web browser and essentially allows the automation process. Therefore the type of web driver you select would depend on the browser you are using. Please select one, or a few, of the options below (several web drivers can be installed on your computer simultaneously, I mostly use Chromedriver, but I always have Gecodriver installed as a backup, just in case).
Download Chrome Web Driver:
Download Firefox Web Driver (Geckodriver):
Additional Web Drivers for browsers such as Safari & Edge can be found here:
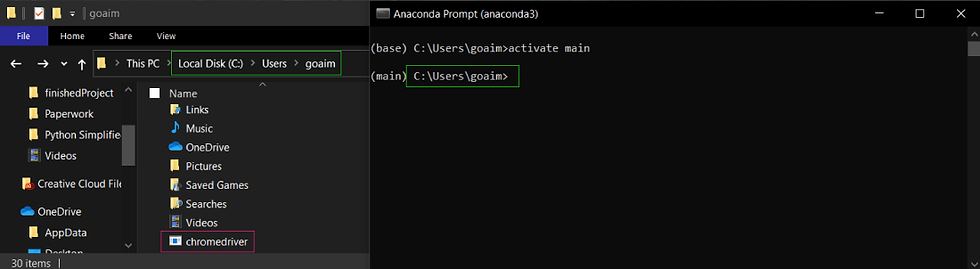
a quick tip: I highly recommend saving chromedriver.exe or geckodriver.exe in your root path, that way you won’t need to specify the URL of your file every time you initialize the driver. In the screenshot below you see my Anaconda root folder, which is in the same directory as my chromedriver.exe file.
Initialize a Web Driver Object
We’ll begin with the most basic Selenium commands — setting up the Web Driver, initializing it and navigating to a URL of your choice, in our case instagram.com:
from selenium import webdriver

file_path = 'C:/Users/goaim/chromedriver.exe'

driver = webdriver.Chrome(file_path)
driver.get("http://www.instagram.com")
Or alternatively, if you saved your webdriver inside the root folder, you can simply type the following and skip the file_path specification:
from selenium import webdriver

driver = webdriver.Firefox() #NOTE: FIREFOX EXAMPLE
driver.get("http://www.instagram.com")
These commands will result in a new browser window opening-up and navigating to www.instagram.com.
Login to your Instagram account:
We’ll begin by opening our developer tools (with a right mouse click anywhere on the page , then selecting “developer tools”). This will present you with the source code of a given web page, allowing you to see all the DOM elements.
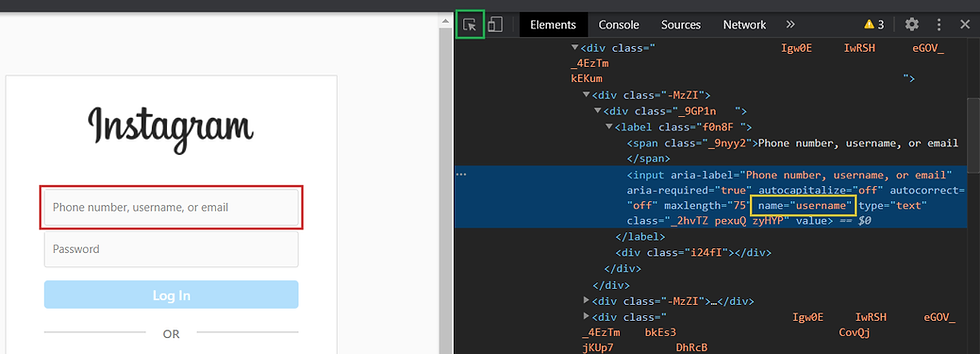
Then we’ll select the inspect tool (denoted by a green square on the image above) and click on the username input filed (red rectangle on the above image). Once we do that, the developer tools will present us with the source code of the particular element we’ve selected. In our case, we will focus on the name attribute (yellow rectangle) of this input element, and we’ll note that it is equal to “username”.
But back in our code, a very curious thing happens when we try to target this element. We get a really annoying error no matter which selector we use and even though the official Selenium documentation swears by the following commands — these will not work in the case of Instagram:
username = driver.find_element_by_name(‘username’)
username = driver.find_element(By.XPATH, '//input[@name="username"]')
username = driver.find_element(By.CSS_SELECTOR,"input[name='username']")
Each of these 3 commands will result in the exact same error, even though they all use correct methods of selection:
NoSuchElementException: Message: no such element: Unable to locate element: {"method":"css selector","selector":"input[name='username']"}So what are we missing here??
We tend to forget that each webpage has its own life cycle, where all the elements load one after the other to assemble the content. So if the element we are targeting is still being processed and hadn’t loaded on the page yet — Selenium won’t be able to detect it.
Avoid the NoSuchElement Exception
Consider the following solution to this problem; we will wait until the element becomes clickable and only then we will select it. If the element is not found within 10 seconds - we'll trigger a Timeout Exception to avoid an infinite loop (in case out element is indeed not existing on the page or if it was selected incorrectly). For this, we’ll need to import 3 simple functions with very scary and long import statements: EC (Expected Conditions), By and WebDriverWait. Other than that, they are very user friendly and we combine all of them in just one line of code! We’ll add the following method of selection to our code (and if we’re already there, we’ll select the password input as well! * suggestion: have a peek in the developer tools to find the name attribute of our password input field, and construct your own command for selecting it):
from selenium.webdriver.common.keys import Keys
from selenium.webdriver.support import expected_conditions as EC
from selenium.webdriver.common.by import By
from selenium.webdriver.support.wait import WebDriverWait

username = WebDriverWait(driver, 10).until(EC.element_to_be_clickable((By.CSS_SELECTOR, “input[name=’username’]”)))

password = WebDriverWait(driver, 10).until(EC.element_to_be_clickable((By.CSS_SELECTOR, "input[name='password']")))
WebDriverWait Breakdown
Remember how I called this long line of code "user friendly"? so let's quickly break it down to it's core elements and see how easily we can construct them back.
a. WebDriverWait() is literally asking your webdriver to wait before it executes the command specified inside .until(). WebDriverWait accepts 2 arguments:
driver: represents the webdriver object we initialized earlier (driver)
timeout: represents the number of seconds that would pass before a Timeout Exception is triggered (10). An integer data type is expected (int).
b. EC.element_to_be_clickable() has 2 parts:
EC is specifying a condition for the wait. Simply speaking, it asks our software "don't run the command until my condition is met!"
element_to_be_clickable() is one of the available methods you can choose as condition. It not only waits until the element is loaded on the page, but also waits until the browser allows clicking on that element. These methods take-in the element you'd like to select as an argument. See the full list of available EC. methods in the documentation: https://selenium-python.readthedocs.io/waits.html
c. By.CSS_SELECTOR also has 2 components, and it represents the means you'd use to locate the desired element on the page.
Selecting by CSS selector is fast, convenient and very popular. You can target all the attributes of a given DOM element and even specify their properties.
See the full list of available By. arguments in the documentation:
https://selenium-python.readthedocs.io/locating-elements.html
d. "input[name='password']" represents the element we are selecting in a string.
When we combine these functions and methods together, we get a very powerful way of targeting elements.
Enter Username and Password
Now we are safe to enter our own personal user name and password and click on the login button.
* Please note: it is always best to avoid using your personal Instagram account when web scraping. Ideally you want to create a fake account, not associated with your name or personal email. That way, even if Instagram detects you and labels you as a bot - it doesn't affect your personal account and you don't lose it as a result.
username.clear()
username.send_keys(“my_username”)

password.clear()
password.send_keys(“my_password”)

Login_button = WebDriverWait(driver, 2).until(EC.element_to_be_clickable((By.CSS_SELECTOR, “button[type=’submit’]”))).click()
For the login button, we have selected the button element with the type of submit, and we called the click() method on it. The screenshot below shows how the element looks inside the Developer Tools.

Once we run the code above, we are suddenly presented with 2 sequential alert messages, which require special attention!
Handling Alerts
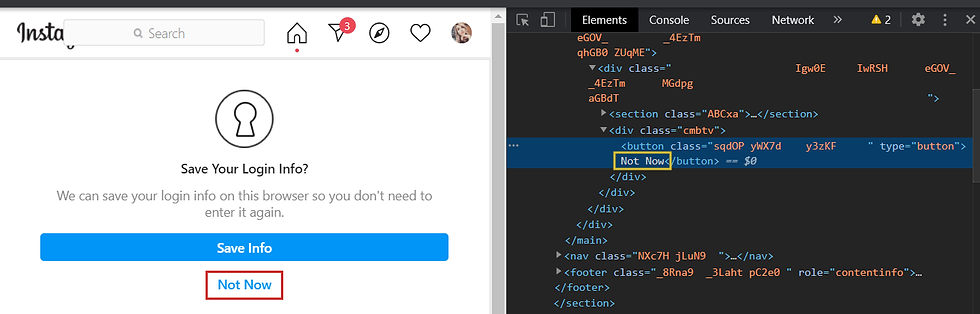
If you notice, in the screenshot above, our desired button element has the type of "button" which is not specific enough to differentiate between it and other button elements on the page.
In these cases, selecting By CSS Selector will not work! It targets attributes inside the <button> element, while the only way for us to select that button is by targeting the text between the opening and closing tag ("Not Now").
We can do this very easily, selecting By.XPATH instead of CSS selectors. We will essentially use the same commands, but only change the selection method and introduce a slightly different syntax:
alert = WebDriverWait(driver, 10).until(EC.element_to_be_clickable((By.XPATH, ‘//button[contains(text(), “Not Now”)]’))).click()

alert2 = WebDriverWait(driver, 10).until(EC.element_to_be_clickable((By.XPATH, ‘//button[contains(text(), “Not Now”)]’))).click()
Note that here we have selected the button that contains text of "Not Now". We were very general with what we have requested, we could have asked to select the button with the text of "Not N" for that matter and get the same results.
XPATH helps us to search within the text of elements or within any of their attributes, and allows us not to be to be specific with our search terms.
Once we run this code, we are finally presented with our Instagram feed and we can move on with searching for keywords.
Search a keyword
Next, we can choose one of 2 ways:
long way (traditional)
shortcut (time saving)
Long Way
We will enter a hashtag inside the search field, in our case — #cats. Then, we will select this element in the toggled menu and we will click it. For this, we will also delay the execution of our Python code and adjust it to the loading speed of our webpage. However, instead of using WebDriverWait, we will use time.sleep(seconds):
import time

searchbox = WebDriverWait(driver, 10).until(EC.element_to_be_clickable((By.XPATH, "//input[@placeholder='Search']")))

searchbox.clear()

keyword = "#cat"
searchbox.send_keys(keyword)
time.sleep(5) # Wait 5 seconds

my_link = WebDriverWait(driver, 10).until(EC.element_to_be_clickable((By.XPATH, "//a[contains(@href, '/" + keyword[1:] + "/')]")))

my_link.click()
Note that we are targeting the input field with the placeholder of search, we make sure it's empty by calling .clear() and only then we type our keyword (#cat) to it by calling send_keys().
Then we wait for 5 seconds to allow the menu to load, and then we click on the anchor element that ends with our keyword (minus the "#", as denoted by slicing the first character of keyword with [1:]. We also used string concatenation to include an opening and closing slash (/) with the keyword we are searching with XPATH.

Shortcut
allow me to present you with a much faster and easier way to reach the exact same result:
hashtag = "fashion"
driver.get("https://www.instagram.com/explore/tags/" + hashtag + "/")
time.sleep(5)
we simply concatenate the URL of our newly opening webpage, and include our hashtag inside it. We avoid many unnecessary lines of code and skip all the clicking!
And once we reached the home of the #cat hashtag, we’ll scroll down the page using a for loop and select as many image elements as we need.
Scroll to the Bottom of the Page
We will pre-define the number of "scroll down to the bottom of the page" events with n_scrolls, and this will allow us to extract any number of photos.
n_scrolls represents the number of times our browser will scroll to the bottom of the page (document.body.scrollHeight) and we will run this with the help of Javascript:
n_scrolls = 3
for i in range(1, n_scrolls):
    driver.execute_script("window.scrollTo(0, document.body.scrollHeight);")
    time.sleep(5)
Note that Javascript's window.scrollTo() takes in 2 parameters: the first represents the y value to begin scrolling from (0 in our case, top of the page), while the second parameter represents the y value where the scrolling ends (in our case document.body.scrollHeight which represents the bottom of the page).
Extract Instagram Thumbnails
In most cases you'd be interested in the full-size images and not the thumbnails. However, if you are creating a database for Machine Learning / AI purposes - thumbnails are the way to go! You'd be downsizing these photos anyway, you might as well avoid unnecessary steps and just fetch all these thumbnails in one go.
#select images
images = driver.find_elements_by_tag_name(‘img’)
images = [image.get_attribute(‘src’) for image in images]
images = images[:-2] #slicing-off IG logo and Profile picture

print(‘Number of scraped images: ‘, len(images))
Please note, we first select all the image tags, and then we use list comprehensions to only keep their src property and dispose of the rest. We will also slice-off the last 2 images which usually consist of your profile picture and Instagram’s logo. Lastly, our list of images will include all the thumbnails we'd like to save on out computer.
Extract Instagram Images
If thumbnails are not enough, and you're looking to get the full-size, high quality image - we'll target all the anchor elements on the page, narrow them down to include anchors that link to photos only, and focus on their href attribute, disposing of the rest.
anchors = driver.find_elements_by_tag_name('a')
anchors = [a.get_attribute('href') for a in anchors]
anchors = [a for a in anchors if str(a).startswith("https://www.instagram.com/p/")]

print('Found ' + str(len(anchors)) + ' links to images')
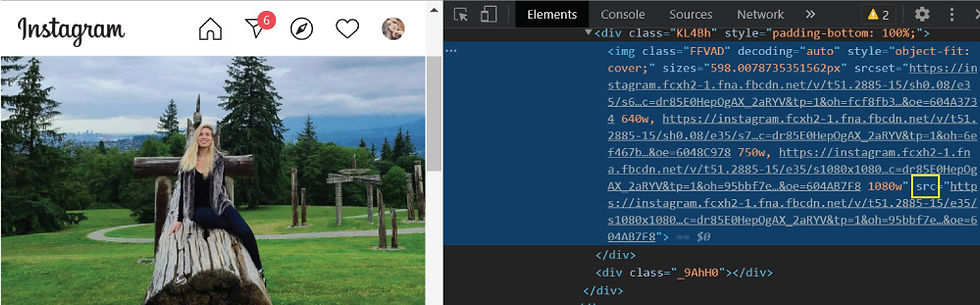
Then, we will navigate to each of these anchors and extract the second image element of each page, which represents the full-size image (the first image in the DOM is always our profile picture):
images = []

for a in anchors:
    driver.get(a)
    time.sleep(5)
    img = driver.find_elements_by_tag_name('img')
    img = [i.get_attribute('src') for i in img]
    images.append(img[1])
Note that here we have created an empty list to store our future images, then we began iterating over the list of anchors. We followed each link, extracted all the image elements from it, only kept the value of their href attribute and lastly - only kest the second image of each page, and added it to our images list.
In the end of this process, images will be populated with all the high quality photos we'd like to save on our computer.
Create a new directory for the scraped images
Once we have the URLs of our images in a neat list, we’ll create a brand new folder inside our current directory (cwd).
import os
import wget

path = os.getcwd()

#path = os.path.join(path, hashtag)
path = os.path.join(path, keyword[1:] + “s”)

os.mkdir(path)
Here, we navigated to the directory of our Python file or .ipynb notebook and we created a brand new folder named as our hashtag or keyword (minus the "#" and plus the "s" to form "cats").
Download web scraped images
Lastly, we will use wget to help us with downloading the images. We’ll create a variable “counter” which will represent the index of each image so that the file names we set are formatted as “1.jpg”, then “2.jpeg” and so on all the way until the last image. Or alternatively, you can incorporate your keyword or hashtag when naming the images and make them more specific.
counter = 0
for image in images:
    save_as = os.path.join(path, str(counter) +
    '.jpg')
    #save_as = os.path.join(path, hashtag + str(counter) +
    '.jpg')
    wget.download(image, save_as)
    counter += 1
And now, we can sit back, relax, press on the Run All Cells button and be impressed with our superior coding skills! Now each time you’ll revise the keyword — you’ll get a brand new folder filled with images within seconds!
Are you more of a video person?
An early version of this article is also available on Youtube, so you can follow the step by step tutorial and code along with me! (link to the starter files available in the description of the video)
Other Links:
Early Version Notebook on Github: https://github.com/MariyaSha/WebscrapingInstagram/blob/main/WebscrapingInstagram_completeNotebook.ipynb
Updated Version Notebook, Instagram Commenting Bot on Github: https://github.com/MariyaSha/WebscrapingInstagram/blob/main/Commenting_bot.ipynb
Watch more Awesome Projects on Youtube: www.youtube.com/PythonSimplified
Connect on Linkedin: www.linkedin.com/in/mariyasha888/

can you make a video on how to scrape comments on a specific post on instagram?
Why only can scrape up to 50 image and never more even if i put the scroll to high numbers?